Learning to compress jpg files properly is one of the fastest ways to shrink a web page, but the phrase “without losing quality” needs a careful reading. JPEG is a lossy format, so whenever you compress jpg photos you discard some image data. The real goal is to discard only what visitors cannot see. This guide covers the settings, tools and checks that get you there, and the habits that quietly damage images.
What “Without Losing Quality” Means and How JPEG Compression Works
MDN describes JPEG as the most widely used lossy format for still images, built on the discrete cosine transform and best suited to photographs. The encoder splits an image into small blocks and rounds off fine detail according to a quality value from 0 to 100. web.dev notes that the scale is subjective, so “75” does not mean the same thing in every tool.
Color gets extra treatment through chroma subsampling: brightness is kept at full resolution while color is stored at lower resolution, which is often imperceptible. Push too far and you see blocky squares, ringing around edges and smeared color.
So “no quality loss” really means visually lossless: no artifacts a viewer would notice at the size the image is displayed. Anyone who needs to compress jpg images for a blog, shop or portfolio should set that standard first, because it turns a vague wish into something you can test.
Why You Should Compress JPG Files for Websites
Google’s LCP guidance sets 2.5 seconds or less as good and anything above 4.0 seconds as poor, measured at the 75th percentile of page loads. Images matter here. The 2024 Web Almanac found an image was the LCP element on 68% of mobile pages, with a median largest image of 135 KB on mobile and a 90th percentile close to 1 MB. JPEG was still the most common format at 32.4% of images.
Google’s page experience documentation says Core Web Vitals are used by its ranking systems, but good scores do not guarantee top rankings, and relevant content can win even when page experience is weak. If you compress jpg assets before upload, the first beneficiary is the visitor on a slow connection; search is a secondary benefit.
To see where your own pages stand, open Chrome DevTools, switch to the Network panel, filter by Img and sort by size. The heaviest files are your best candidates when you compress jpg images, and the Almanac’s 135 KB median for the largest image gives a rough point of comparison, not a target.
Lossless and Lossy Ways to Compress JPG Files
Two kinds of savings exist when you compress jpg files, and they behave differently.
Lossless steps leave the decoded pixels untouched: stripping metadata, optimizing Huffman tables and saving as progressive. In the test described below, optimized progressive encoding made files 4–5% smaller at quality 85 and 7–9% smaller at quality 95, and the decoded pixels matched the baseline version exactly (verified on two of the three images). web.dev calls progressive a sensible default. One caution: keep the color profile and orientation data when removing metadata, or photos may appear rotated or dull. Removing the rest is still worthwhile, because camera files can carry details such as GPS location that you probably do not want to publish.
Lossy steps change pixels: lowering quality, using 4:2:0 subsampling and resizing. On the two images I checked, 4:2:0 produced files about 20–22% smaller than 4:4:4 at quality 85. Photographs usually tolerate it; text and sharp edges do not. Knowing which category each step belongs to tells you how aggressively you can compress jpg photos without risking visible damage.
Which Quality Setting Should You Use to Compress JPG Images?
I encoded three public sample photographs (512×512, 451×300 and 600×400 pixels, from scikit-image) with Pillow 12.3.0, then measured file size against a quality-100 reference plus SSIM, a similarity score where 1.0 means identical. This was a sandbox measurement, not a published study.
| Quality | Size vs. quality-100 file | SSIM range |
|---|---|---|
| 95 | 27.6–34.2% | 0.963–0.982 |
| 85 | 15.0–19.0% | 0.931–0.963 |
| 75 | 11.2–14.1% | 0.908–0.948 |
| 60 | 8.4–10.8% | 0.884–0.930 |
Dropping from 95 to 85 cut size by 44–46%, while going from 85 to 75 saved a further 25–27%. Returns diminish quickly. As a starting point, my recommendation is roughly 80–85 for hero images and 70–80 for thumbnails, then inspect the result. Lighthouse benchmarks against quality 85 and flags images that could save 4 KiB or more, per its audit documentation.
To reproduce the test, open an image with Pillow, call save("out.jpg", "JPEG", quality=85, subsampling=2, optimize=True, progressive=True) and compare sizes. The limits are real, three small images, one encoder, and SSIM is only a proxy for human judgment. Your own photos may behave differently.
Resize Before You Compress JPG Files
Pixel dimensions usually affect file size more than the quality slider. A 4,000-pixel-wide photo shown in an 800-pixel column wastes bytes whatever the quality setting, so resize first and then compress jpg output from the resized copy.
WordPress 5.3 added a default 2560-pixel threshold, larger uploads are scaled down while the original stays in the uploads folder, and developers can change it with the big_image_size_threshold filter. Google’s image guidance recommends srcset or <picture> for multiple sizes, with a fallback src. As a rule of thumb (my recommendation, not a standard), export at about twice the displayed width for high-density screens. If a template displays an image at 800 pixels, a 1,600-pixel source is usually enough; going beyond that adds bytes without adding visible detail. Teams that compress jpg files in bulk can apply the same maximum width to every upload.
Step-by-Step Workflow to Compress JPG Images
- Keep the original. Always compress jpg copies, never the master file.
- Crop and resize to the largest size the layout actually uses.
- Set quality between 75 and 85 as a starting point.
- Choose progressive encoding and 4:2:0 subsampling for photos.
- Compare at 100% zoom and at display size. Look at skin, sky gradients and text edges.
- Run Lighthouse or PageSpeed Insights to confirm no remaining savings are flagged.
For tools, Lighthouse suggests desktop optimizers such as ImageOptim or browser-based Squoosh, plus optimization plugins for platforms like WordPress. If you want a quick option, the Compress Image tool handles JPG, PNG and WebP with a quality slider that starts at 75. For wider planning, see the image optimization guide.
Whichever tool you choose, judge it by the result, not the label. Export two versions of the same photograph, open them side by side, and keep the smaller one only if you cannot tell them apart at the size visitors will see. That habit matters more than any single setting when you compress jpg files across a whole site, because images differ, a foggy landscape hides artifacts easily, while a portrait with fine hair and skin texture exposes them.
Choosing an Encoder to Compress JPG Files
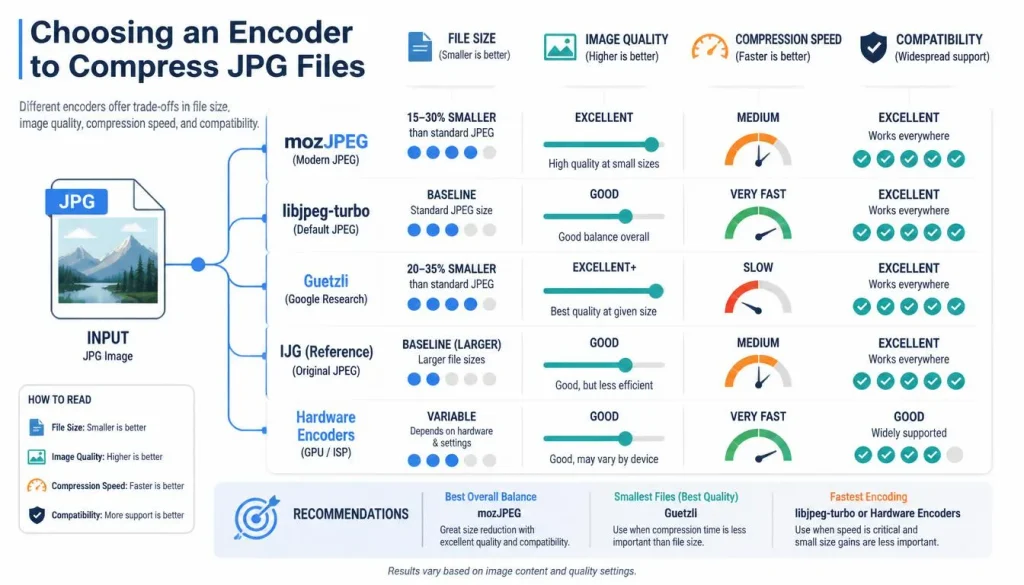
Most tools that compress jpg files use one of three encoders. MozJPEG is compatible with browsers and the libjpeg API and adds trellis quantization and progressive optimization, though its page gives no benchmark figures.
Google’s Jpegli claims a 35% compression improvement at high quality settings, with output that works in existing viewers. Its announcement describes a crowdsourced comparison in which Jpegli at 2.8 bits per pixel beat libjpeg-turbo at 3.7. That is the vendor’s own evaluation, so treat 35% as an upper-end claim and test your images before you compress jpg files in bulk.
Common Mistakes When You Compress JPG Files
- Re-saving at changing settings. In my test, ten consecutive saves at identical quality 85 moved SSIM by 0.005 or less on the two images checked. I did not test mixed settings or resizing between saves, which is where losses should compound. Edit from the original.
- Using JPEG for logos, screenshots and text. MDN advises lossless formats for sharp edges because fringes show clearly.
- Expecting transparency. JPEG has no alpha channel, so a logo with a see-through background needs another format.
- Compressing a file that is already compressed. Downloaded stock images or CMS-generated thumbnails have often been through an encoder once; compress jpg originals instead whenever you can.
- Lazy-loading the LCP image. The Almanac found 9.5% of mobile LCP images used native lazy loading, which can delay the very element being measured.
- Neglecting alt text and filenames. Google calls alt text the most important image attribute and prefers names like
my-new-black-kitten.jpgtoIMG00023.JPG.
A Documented Case: Image Work Versus Core Web Vitals
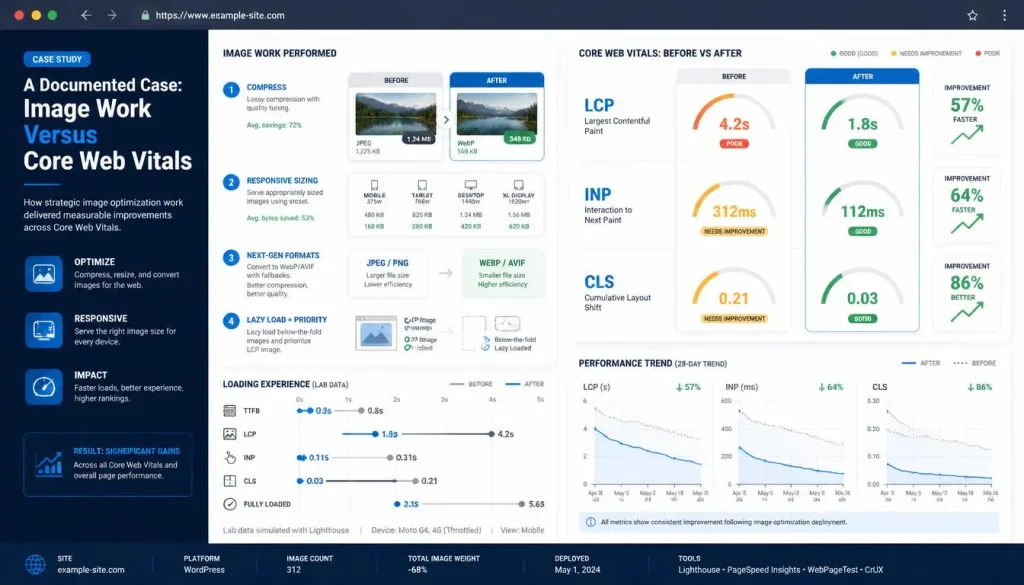
Smashing Magazine’s 2021 case study shows why compression is only one lever. Its team compressed the author photo as AVIF and inlined it, adding 3 KB to the HTML. Lab tools looked impressive, but field LCP stayed around 2,400–2,500 ms and kept hovering near the passing line. The article credits the move to green mainly to font-loading changes.
The limits matter: no exact before-and-after figures for the image change are given, AVIF support was narrower then, and the result applies to one site. The lesson is to verify improvements in field data, and to look at fonts, server speed and the LCP element itself, not only at the moment you compress jpg files.
Troubleshooting Blurry, Blocky or Heavy JPGs
| Symptom | Likely cause | Fix |
|---|---|---|
| Blocky squares in sky | Quality too low | Raise quality in steps of 5 |
| Fuzzy red or blue edges | Heavy chroma subsampling | Try 4:4:4 for that image |
| File still large | Oversized dimensions | Resize first |
| Washed-out colors | Profile removed | Keep or convert to sRGB |
| Lighthouse still flags it | Savings above 4 KiB at quality 85 | Re-encode or lower quality |
If none of these fixes works, the image may simply not suit JPEG, as with flat graphics or text-heavy screenshots. In that case, stop trying to compress jpg versions of it and choose a lossless format.
Should You Move Beyond JPEG to WebP or AVIF?
Adoption is growing slowly: WebP was 12% of images in 2024 and AVIF roughly 1%, according to the Almanac. Google Search supports WebP and AVIF alongside JPEG, and MDN recommends a <picture> element with a JPEG fallback. Newer formats can shrink files further, but you still need a well-prepared JPEG, so learning to compress jpg files well remains useful.
Conclusion
To compress jpg files for a website without visible damage, treat quality as a range, not a single number. Resize to the displayed dimensions first, then encode photographs at roughly 75–85 with progressive output, and add lossless steps for extra savings. Inspect results at display size, since SSIM and file size cannot replace your eyes.
Remember that knowing how to compress jpg files is only part of performance. The case study shows that field data, fonts and the LCP element decide whether pages reach the 2.5-second target. Next, pick your five heaviest JPEGs, re-export them from originals using this workflow, and compare Lighthouse results before and after.
Frequently asked questions
How to reduce JPG file size without losing quality online?
Upload your photo to a free online JPG compressor, keep the quality slider around 75–85, and download the smaller file. Resize oversized photos first, because it usually saves more than the slider does.
Can I compress a JPG without losing quality?
Only partly. JPEG is a lossy format, so any quality reduction discards some data. Lossless steps like removing metadata and optimizing the encoding keep the pixels identical, and moderate quality settings usually look unchanged to the eye.
How can I increase the size of a JPG image without losing quality?
You can’t add real detail to a small image, so enlarging it always costs some sharpness. Enlarge only a little, or use an AI upscaler, and always work from the largest original you have.
How to compress a file but keep quality?
Use a high-quality setting (about 75–85 for photos) and resize to the size you’ll actually display. Then compare the result with the original at normal viewing size and keep the smaller file only if you can’t see a difference.
What is the best image compressor?
It depends on your workflow: Squoosh (browser) and ImageOptim (desktop) are both recommended in Lighthouse’s documentation, and an online tool like yours works for quick jobs. Whichever you pick, judge it by how the compressed image looks, not by the compression percentage.