Free · Private · No signup
To compress image files instantly without losing clarity, simply drop your photos into our tool below. Large images drag down your website speed, clog up email inboxes, and constantly trigger file limit errors on upload forms. Our free, tool allows you to compress image formats like JPG, PNG, and WebP in just a few seconds with absolutely zero software to install and no account sign-ups required.
Compress an image in 3 simple steps
Compress Image in three simple steps. First, upload your image from your device or add it using a supported URL. Next, choose your preferred format and quality to get the right balance between file size and image clarity. Finally, click Compress Image & download your optimized image in seconds.
1: Add your image
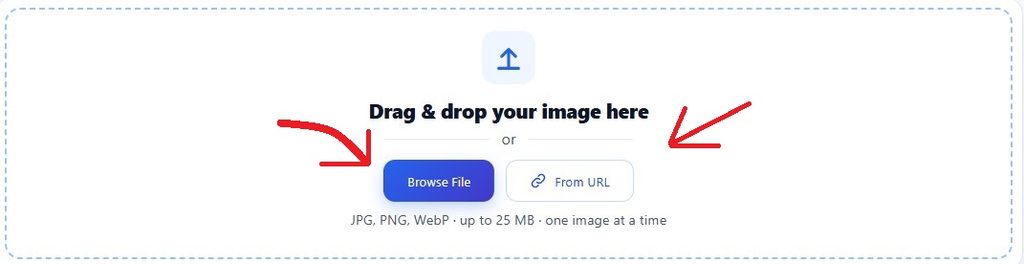
Drag a file into the box, or press Browse File and pick one from your phone or computer. If the picture is already online, switch to From URL, paste the direct link to the image and press Fetch Image. The tool takes JPG, PNG and WebP files up to 25 MB. Once it loads, you will see the file name, format, current size and dimensions so you know exactly what you are starting with.
2: Choose format and quality
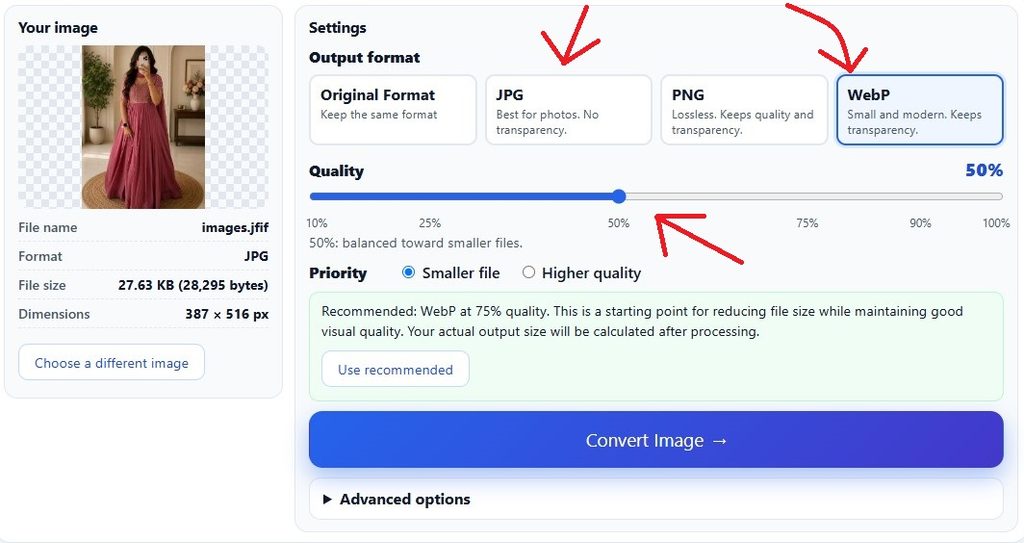
Leave Output format on Original Format if you only want a smaller file of the same type, or pick JPG, PNG or WebP to convert at the same time. Then set the quality. The slider starts at 75, a sensible middle ground for most photos. You can also pick a Priority: Smaller file or Higher quality. The tool also shows a recommendation for your image, and if your slider is set differently, a Use recommended button appears so you can switch to its suggestion with one click. Advanced options let you set a maximum width, choose lossless WebP, or change the background colour used when a transparent image is saved as JPG
3: Compress Image and download
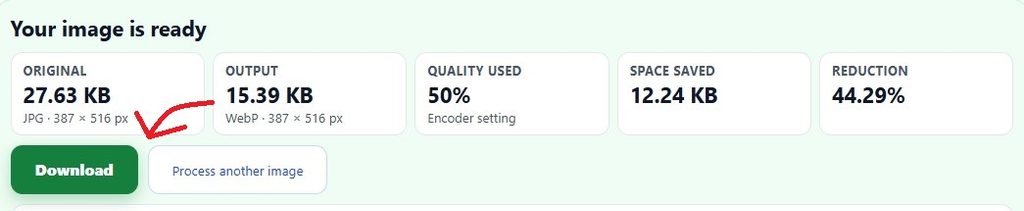
Press Compress Image. When it finishes, the results panel shows the original size, the new size, the quality used, the space saved and the percentage reduction. If you are happy, press Download. If you want a smaller or cleaner result, change the settings and compress image again, or press Process another image to start on a new file. Your download is named after the original with “compressed” added, so it will not overwrite the picture you started with.
Why choose Image Compress?
Private by design
The work happens in your browser. photo you pick from your device is not uploaded to a server for processing, which means no waiting for an upload, no copy left behind and nobody else looking at your files. That matters for scans of documents, client photos and anything personal.
Nothing is sent to a server, and no copy is left behind afterwards. That makes it a sensible way to compress image files such as ID scans, receipts, family photos and client work.
- No signup: you can compress image files without creating an account or giving an email address.
- No stored files: after you compress image files there is nothing to delete, because nothing is kept.
- Metadata removed: camera details, date stamps and GPS location are not included in the new file, which helps before you share a photo online.
Real results, no guesses
Many tools show an estimate and hope it is close. This one encodes the image first and then measures the file it actually made, so every number in the results panel is the real size you will download.
Never a bigger file by accident
Sometimes an image cannot be made smaller, either because it was already compressed well or because the new format suits it badly. When a JPG or lossy WebP would come out larger, the tool tries lower quality settings on its own. If it still cannot beat the original, it warns you instead of silently giving you a heavier file. You can override that with Convert anyway when a format change matters more than size.
Compress and convert
Shrinking a file and changing its format are one step here. Turn a large PNG into a WebP, save a photo as JPG for a platform that insists on it, or keep the same format and just lose the weight. Transparent PNGs saved as JPG get a background colour of your choice, white by default.
Clear results at a glance
The results panel puts the numbers that matter in one row, original size, output size, quality used, space saved and reduction. The Download button sits right underneath, so you do not have to scroll around to finish the job.
Works with links
You do not have to download an image just to shrink it. Paste the direct address of a JPG, PNG or WebP and the tool fetches it for you. If a website blocks that, save the image and upload the file instead.
One small exception: if you use the From URL option to compress image files that are already online, your browser downloads the picture from the address you typed in, straight from the other website to you. That is the only network request involved. To check, open your browser network tab while you work: when you press the Compress Image button, your file is not sent anywhere.
Good habit: after you compress image files, use the before and after preview to check the result at normal size, and always keep your untouched original in case you want a different setting later.
Which format should I choose?
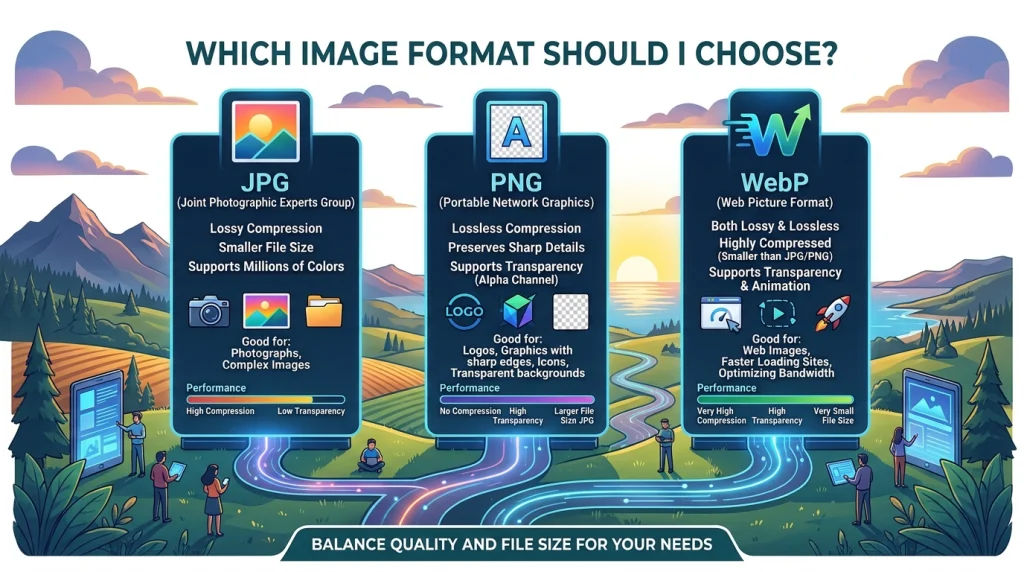
There is no single best format, only the best one for the picture in front of you. Photographs have millions of subtle colour changes and do well with lossy formats like JPG and WebP, which trade a little invisible detail for a much smaller file. Graphics with flat colours, sharp edges and text, such as logos and screenshots, look better in a lossless format like PNG, where every edge stays crisp. WebP can handle both jobs, which is why it is a popular choice for websites.
If you are unsure, leave the output on Original Format. The tool will keep the file type you started with and simply make it lighter.
| Format | Best For | Transparency | Notes |
|---|---|---|---|
| JPG | Photos, blog images, email attachments, and social media | No | Works almost everywhere. Low quality settings can cause blocky patches and blurry edges. Not ideal for text or logos. |
| PNG | Logos, icons, screenshots, and graphics with sharp edges | Yes | Lossless quality preserves details, but PNG photos are often larger than JPG or WebP versions. |
| WebP | Website photos, graphics, and images where smaller file sizes matter | Yes | Often much smaller than JPG at similar quality. Supports lossy and lossless compression, but some tools may not export it. |
| Original Format | Reducing file size without changing the image format | Preserved | Useful when you need to keep the existing format or are unsure which format to choose. |
Why compress your images?
Pictures are usually the heaviest part of a web page. A single phone photo can easily be 3 to 8 MB, and a page with a few of them can weigh more than everything else on the site put together. Visitors on a mobile connection feel that immediately, and many of them leave before the page has finished loading.
- It makes your website faster. Smaller images download sooner, and on most pages the biggest image near the top decides how quickly the page looks ready. Search engines measure that through Core Web Vitals, and a lighter hero image is one of the easiest ways to improve the score. If you run WordPress, uploading images that are already compressed also keeps your Media Library and your backups from ballooning.
- It gets files through size limits. Email providers commonly cap attachments at roughly 20 to 25 MB in total, and job portals, government forms, support tickets and online shops often allow only 1 to 5 MB per image. Compressing the file first is much quicker than arguing with an upload form.
- It saves data and storage. Smaller files use less mobile data to send, less cloud storage to keep and less bandwidth on your hosting plan every time someone views them.
- It does not have to cost you quality. The usual mistake is compressing too hard, or not resizing at all. A photo that is 4000 pixels wide but displayed at 800 pixels carries five times more pixels in each direction than anyone will see (25 times more in total). Reducing the dimensions first, then compressing at a quality of 75 to 85, usually gives the biggest saving with no visible change. Always keep your original file somewhere safe, so you can start again from it if you need a different size later.
Frequently asked questions
How do I compress an image without losing quality?
Upload your image, keep the quality between 75% and 85%, and choose WebP or JPG. At these settings most photos get much smaller with no visible difference. For screenshots, logos and graphics, use PNG (lossless) or a higher quality such as 90%. Your real output size is measured after processing, so you always see the exact result.
Is this image compressor free to use?
Yes. Image Compress is completely free, with no signup, no watermark and no daily limit.
Are my images uploaded to your server?
No. Images you add from your device are compressed inside your own browser, so they never leave your computer or phone. If you use the From URL option and the other website blocks direct access, our server fetches that image temporarily so it can be loaded into the tool. It is not stored.
What is the maximum image size?
Each image can be up to 25 MB, and up to 50 megapixels in dimensions. Supported formats are JPG/JPEG, PNG and WebP.
Why did my image get bigger after converting to WebP or PNG?
Changing format does not always shrink a file. A highly optimized image can become larger when re-encoded, and converting a JPG or WebP to PNG usually increases the size because PNG is lossless. Compress Image tries lower quality settings automatically and will not give you a larger file unless you turn on Allow larger output.
Can I compress a PNG without losing transparency?
Yes. Choose Original Format or PNG for lossless optimization that keeps every pixel and the transparency. WebP also keeps transparency and is often smaller.
How do I compress an image from a URL?
Click From URL, paste a direct link to a JPG, PNG or WebP image, and press Fetch Image. The image then opens in the same tool with the same settings as an uploaded file.
Does the quality percentage show how much smaller the file will be?
No. The percentage is the encoder’s quality setting, not the share of file size kept or removed. 75% quality does not mean 75% of the original size. The actual size depends on the image and is calculated after encoding.
Which format is best: JPG, PNG or WebP?
Use JPG for photos that need to work everywhere, PNG for lossless graphics and screenshots, and WebP for the smallest files on modern websites. See the format table on this page for a quick comparison.
Explore more
A few habits will get you better results from any image you put on the web.
Resize before you compress Image. Work out how wide the image will really be on your page. Full-width banners rarely need more than 1600 to 2000 pixels, and an image inside a blog column is fine at 800 to 1200. Set that as the maximum width in Advanced options and you will often save more than quality changes alone.
Match the format to the picture. If a compressed photo looks smudgy, check whether it is really a graphic or screenshot that belongs in PNG. If a PNG is huge, check whether it is really a photograph that would be happier as JPG or WebP.
Check the result at normal size. Look at the downloaded file the way a visitor would see it, not zoomed in to 400%. If it looks right at its display size, you have probably found the best balance.
Name files clearly. Descriptive file names such as blue-ceramic-mug-front.jpg help both search engines and the people who manage your media library, and they cost nothing.
Whenever you have another picture to lighten, come back, drop it in and it takes seconds.